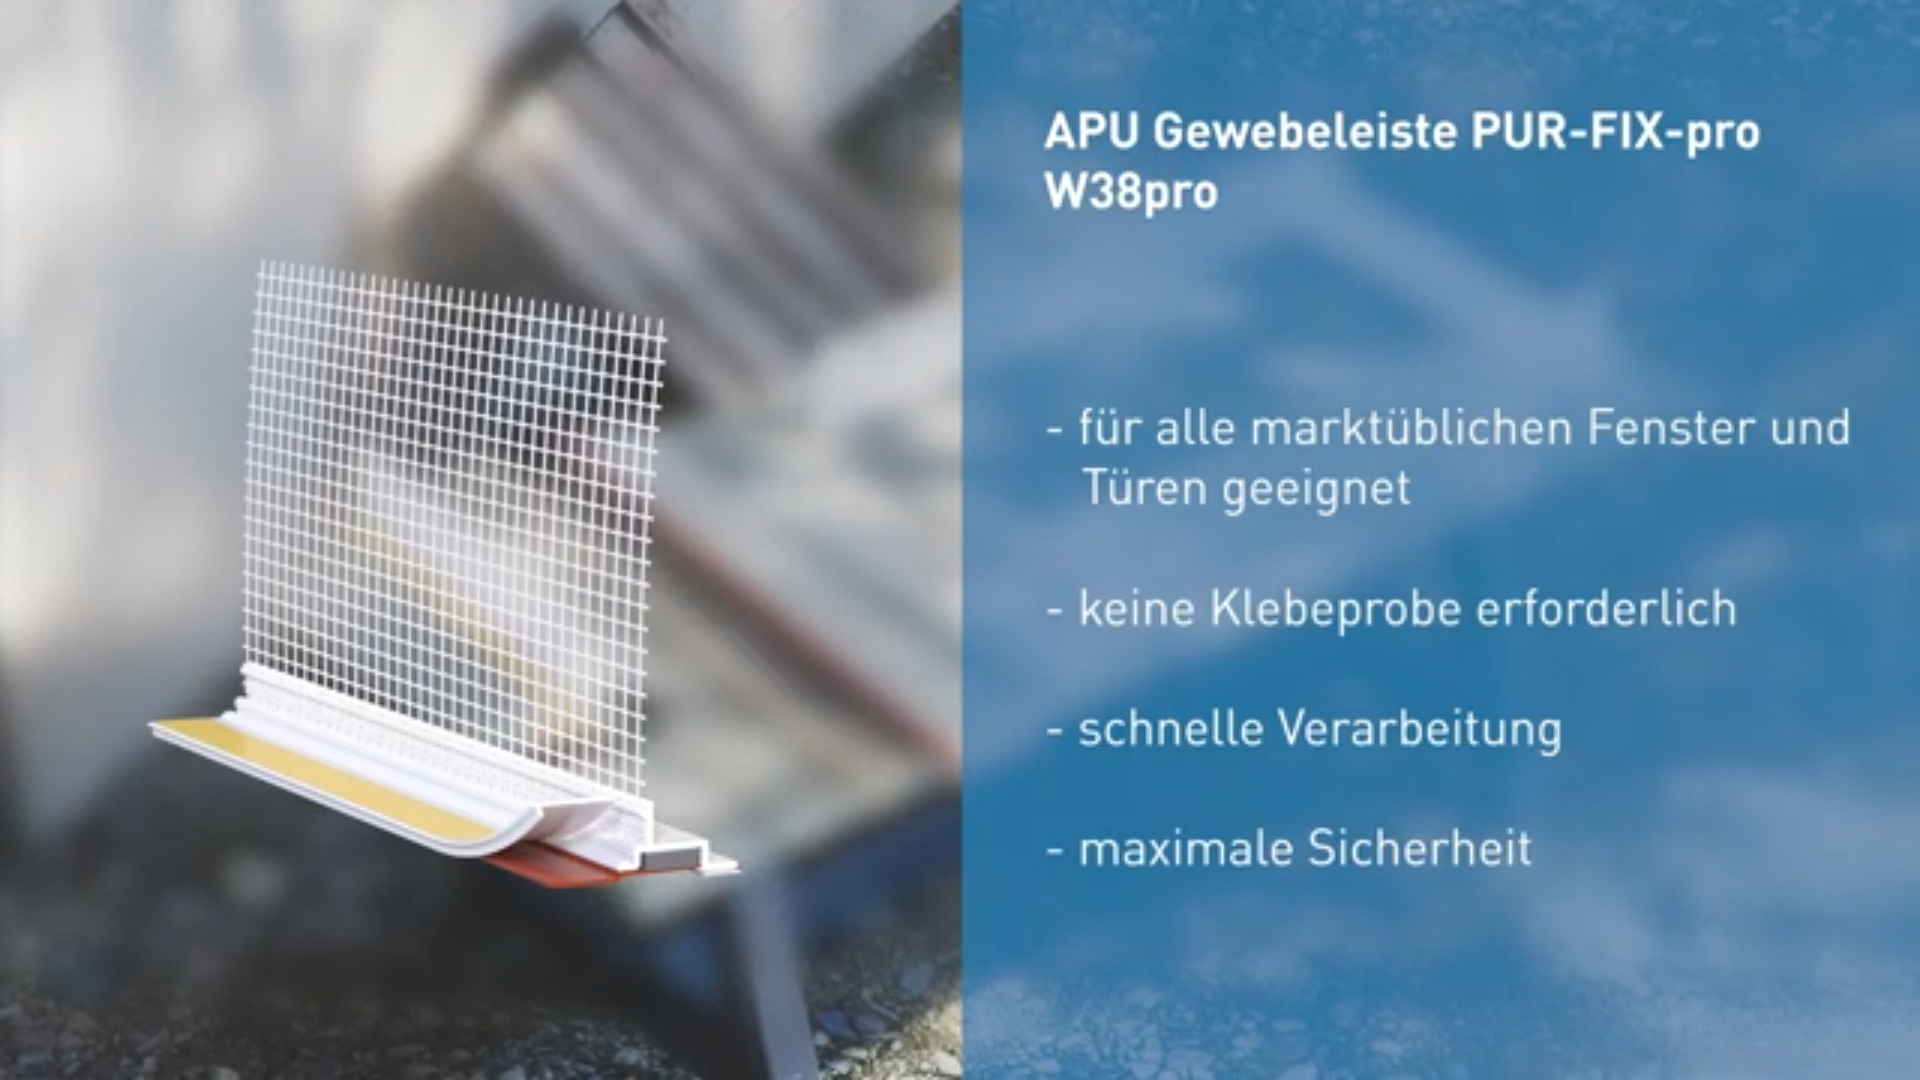
APU plastering strip W38 PUR-FIX
APU Teleskop-Gewebeleiste W30plus - IDEAL-plus Verarbeitung (german)

APU Verarbeitungsvideo Klebeprobe (german)
When using profiles with an adhesive seal
you must carry out a test of adhesion (Perform adhesion test) and clean the sub-surface.
Before the profiles are stuck on, all sub-surfaces must be even, clean, dry and free of dust and any residues impairing adhesion (clean with a dry, clean cloth).
If you intend to use a cleaning agent, you should consult the manufacturer of the window in question and get their approval.
When using profiles with a pressure seal
there is no need to assess the sub-surfaces, test the adhesion or do any laborious cleaning.
In this case the seal via the integrated PUR sealing strip is made directly with the window frame.
This attachment can thus be made faster and on all standard windows and doors, as the profile forms a seal on the sub-surface in a decoupled way and thus provides maximum reliability.
On critical sub-surfaces in particular it is always advisable to use a profile with a pressure seal and no adhesive joint. Examples of critical sub-surfaces are laminated plastic window frames, painted wooden window frames and powder-coated metal window frames. An escape of wax, oil or plasticisers can never be completely ruled out.
Adhere to the latest APU selection criteria.
Any applications not clearly described in the documents may be implemented only after consultation with the plaster or system manufacturer.
Before using adhesive profiles you should perform an adhesion test.
Where
Clean a concealed spot using a dry, clean cloth (and no cleaning agent). The sub-surface must be even, dry, free of dust and suitable for the profile to be stuck on permanently. Any residues that would impair adhesion must be removed. When the work is being done, the surface temperature must be at least +5 degrees and must not exceed +40 degrees.
How
Cut off the test profile (Z24) or a short piece (c. 10 cm) of the profile. Slowly pull off the self-adhesive PE foam tape's protective paper and press the piece of beading down firmly. Wait 10 minutes, then peal/pull the profile away from the sub-surface.
Result
The self-adhesive PE foam tape must remain completely stuck both to the profile and to the sub-surface (adhesive tensile strength test). The sub-surface is in this case suitable for being stuck to.
The sub-surface is suitable for being stuck to:
Profiles with an adhesive seal (PE foam tape) can be used.
Profiles with a pressure seal (PUR sealing strip) can be used.
The sub-surface is not suitable for being stuck to:
Profiles with a pressure seal (PUR sealing strip) must be used.
Where adhesive profiles form a seal through the PE foam tape, we recommend sealing the bottom window groove with a suitable sealant.
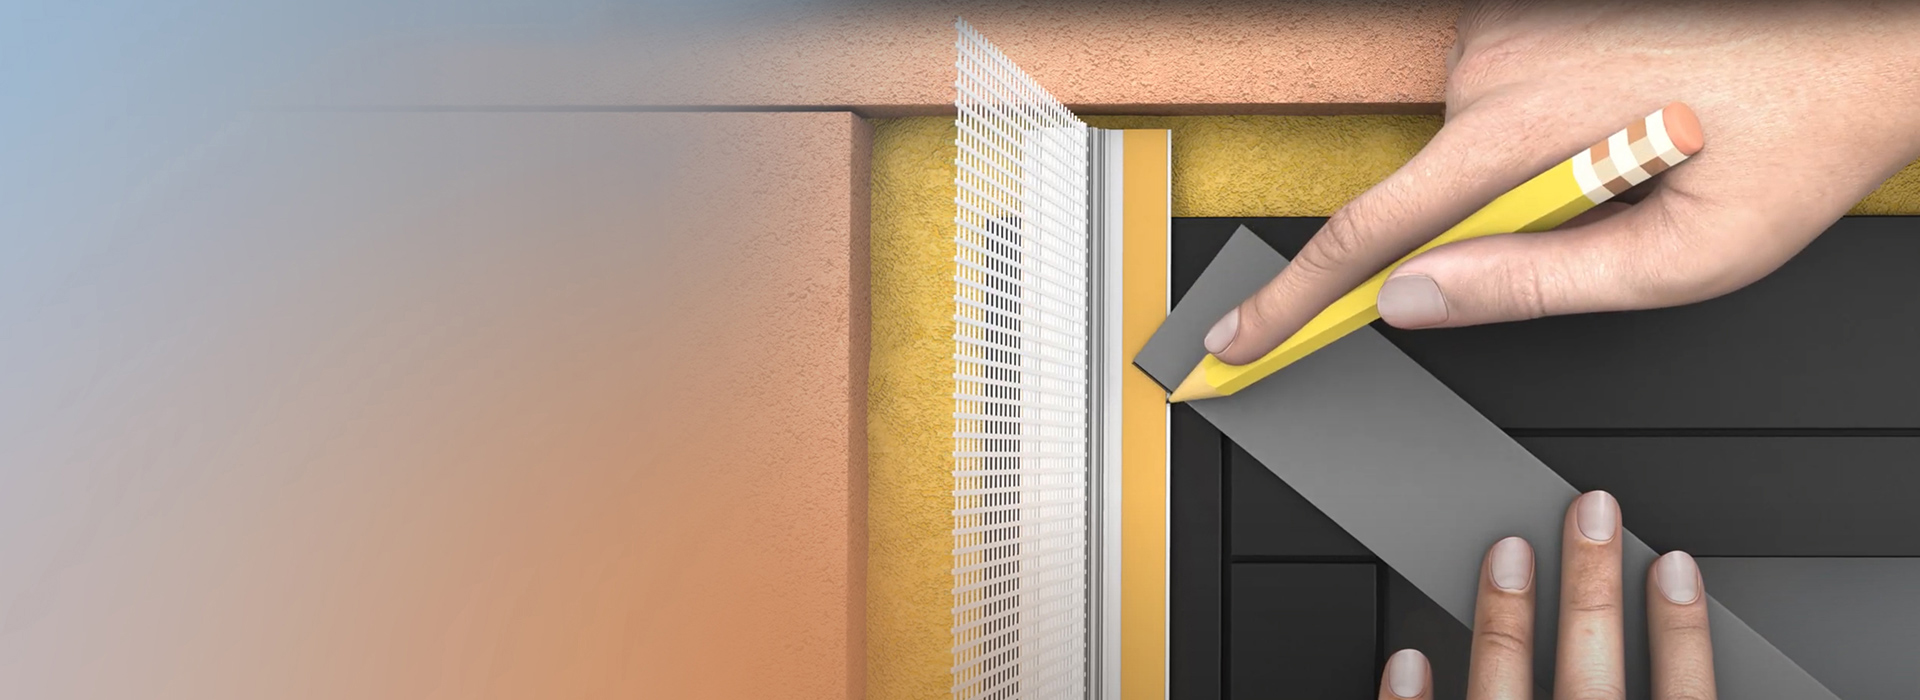
Before sticking on the bead, pull back the protective flap at top and bottom by about 5 cm (makes removal later easier).
PROFILES WITHOUT PUR TAPE
PROFILES WITH PUR TAPE
PROFILES WITHOUT PUR TAPE
PROFILES WITH PUR TAPE
After being set in place on the structural element, profiles with a mesh vane must be promptly embedded. Until then they must be protected from the weather, e.g. sun and wind.
The mesh vane and surface mesh must overlap by at least 10 cm.
The surface mesh to be subsequently attached must be run up to the skimming edge of the profile.
When the work is being done, the surface temperature must be at least +5 degrees and must not exceed +40 degrees.
To avoid them becoming unduly hot, profiles, especially dark ones, should be shielded from direct sunlight when in storage and prior to being plastered over.
Our products are tested according to currently applicable German and Austrian standards and directives.
All inspections and tests are carried out on the basis of the temperate Central European climate zone. Any use in other climate zones (especially outside Europe) must be tested and approved by the manufacturer beforehand.
Any applications not clearly described in the relevant product documents may be implemented only after consultation with the plaster or ETICS manufacturer.
Always store profiles laid down in a dry place.
APU profiles are manufactured from new, high-quality rigid PVC. (Exceptions are W61 and Z20. They are manufactured from recycled, regenerated PVC.)
TPE
FLEXIBLE PVC
Some of our APU profiles get additionally fitted with flexible PVC.
SEALING TAPES ADHESIVE ON BOTH SIDES
PUR SEALING STRIP
GLASS FIBRE FABRIC
This is how functionality of the APU profiles is guaranteed in the appropriate fields of application (as described in the product documentation).
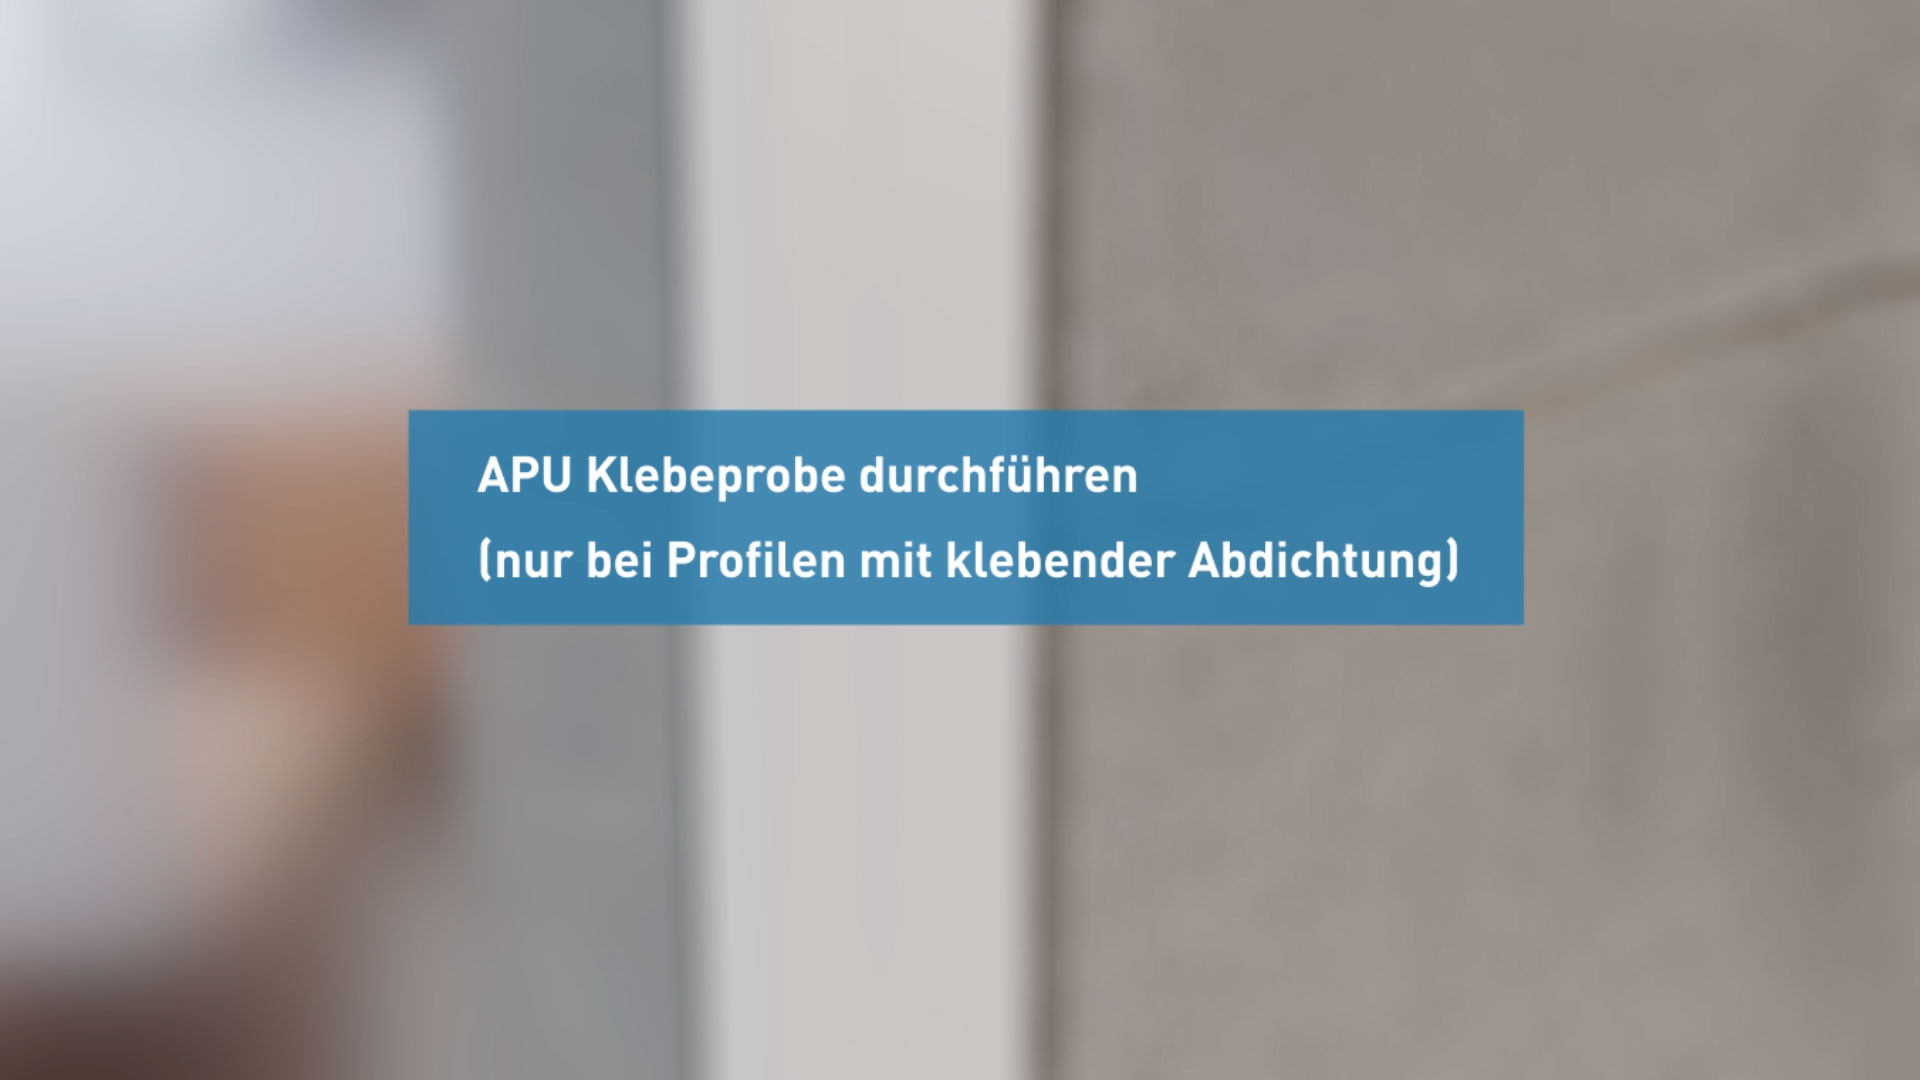
Beim Einsatz von Profilen mit klebender Abdichtung
muss eine Klebeprobe (Klebeprobe durchführen) und eine Untergrundreinigung durchgeführt werden.
Alle Untergründe müssen kurz vor der Verklebung der Profile eben, trocken, staubfrei und frei von haftmindernden Rückständen sein (Reinigen mit einem trockenen und sauberen Tuch).
Sollte ein Reiniger verwendet werden, ist dieser mit dem jeweiligen Fensterhersteller abzustimmen und freizugeben.
Beim Einsatz von Profilen mit drückender Abdichtung
entfallen die Schritte der Beurteilung der Untergründe, die Klebeprobe und die aufwändige Reinigung.
Die Abdichtung über das integrierte PUR-Dichtband erfolgt hierbei direkt am Fensterrahmen.
Dieser Anschluss kann somit schneller und auf allen marktüblichen Fenstern und Türen hergestellt werden, da das Profil entkoppelt am Untergrund abdichtet und somit eine maximale Sicherheit bietet.
Besonders bei kritischen Untergründen empfiehlt es sich stets ein Profil mit drückender Abdichtung ohne Klebeverbindung einzusetzen. Kritische Untergründe sind z. B. Kunststofffenster foliert, Holzfenster lackiert, Metallfenster pulverbeschichtet usw. Der Austritt von Wachsen, Ölen und Weichmachern kann nie ganz ausgeschlossen werden.
Die aktuellen APU-Auswahlkriterien sind einzuhalten.
Anwendungen, die nicht eindeutig in den Unterlagen beschrieben sind, dürfen erst nach Rücksprache mit dem Putz- oder Systemhersteller erfolgen.
Vor dem Einsatz von Klebeprofilen ist eine Klebeprobe durchzuführen.
Wo
An einer verdeckten Stelle mit einem trockenen und sauberen Tuch (ohne Reinigungsmittel) reinigen. Der Untergrund muss eben, trocken, staubfrei und für eine dauerhafte Verklebung geeignet sein. Haftmindernde Rückstände sind zu entfernen. Die Oberflächentemperatur muss bei der Verarbeitung mindestens +5 Grad betragen und darf +40 Grad nicht übersteigen.
Wie
Testprofil (Z24) oder ein kurzes Stück (ca. 10cm) des Profils abschneiden, Schutzpapier des Sk-PE-Schaumband langsam abziehen und das Profilstück fest andrücken. 10 Minuten warten, dann das Profil vom Untergrund abziehen/abschälen.
Ergebnis
Das Sk-PE-Schaumband muss zum Einen komplett am Profil und zum Anderen komplett am Untergrund haften bleiben (kompletter Schaumbruch). Somit ist der Untergrund für eine Verklebung geeignet.
Untergrund ist für eine Verklebung geeignet:
Es können Profile mit einer klebenden Abdichtung (PE-Schaumband) eingesetzt werden.
Es können Profile mit einer drückenden Abdichtung (PUR-Dichtband) eingesetzt werden.
Untergrund ist nicht für eine Verklebung geeignet:
Es müssen Profile mit einer drückenden Abdichtung (PUR-Dichtband) eingesetzt werden.
Bei Klebeprofilen die durch das PE-Schaumband abdichten empfehlen wir die untere Fensternut mit einem geeigneten Dichtstoff abzudichten.
Die Schutzlasche vor dem Ankleben oben und unten ca. 5 cm an der Bruchlinie einreissen (erleichtert später das Entfernen).
PROFILE OHNE PUR-BAND
PROFILE MIT PUR-BAND
PROFILE OHNE PUR-BAND
PROFILE MIT PUR-BAND
Profile mit einer Gewebefahne sind nach dem Setzen am Bauteil zeitnah einzuspachteln und bis dahin vor Witterungseinflüssen (wie beispielsweise Wind, Sonne) zu schützen.
Die Gewebefahne und das Flächengewebe müssen mindestens 10 cm überlappen.
Das nachfolgend anzubringende Flächengewebe muss bis an die Abzugskante des Profils herangeführt werden.
Die Oberflächentemperatur muss bei der Verarbeitung mindestens +5 Grad betragen und darf +40 Grad nicht überschreiten.
Zur Vermeidung einer erhöhten Aufheizung sind insbesondere dunkle Profile bei der Lagerung und vor dem Einputzen vor direkter Sonneneinstrahlung zu schützen.
Unsere Produkte werden nach aktuellem Stand von Normen und Richtlinien in Deutschland und Öster-reich geprüft.
Alle Prüfungen und Tests wurden auf der Grundlage der mitteleuropäischen Klimazone durchgeführt. Der Einsatz in anderen Klimazonen (insbesondere ausserhalb von Europa) muss vorher vom Hersteller geprüft und freigegeben werden.
Anwendungen, die nicht eindeutig in den jeweiligen Produktunterlagen beschrieben sind, dürfen erst nach Rücksprache mit dem Putz- oder WDVS-Hersteller erfolgen.
Profile immer trocken und liegend lagern.
Die APU-Profile werden aus neuem, hochwertigen Hart-PVC-gefertigt. (Ausnahme W61 und Z20. Diese werden aus recyceltem PVC-Regenerat hergestellt.)
TPE
WEICH-PVC
Die APU-Profile werden teilweise zusätzlich mit Weich-PVC ausgestattet
DOPPELSEITIG KLEBENDE DICHTBÄNDER
PUR-DICHTBAND
GLASFASERGEWEBE
Die Funktion der APU-Leisten in den jeweiligen An-wendungsgebieten (wie in den Produktunterlagen beschrieben) wird hiermit gewährleistet.